Hello, and welcome to our skoolie conversion photo gallery!!
We will number all the photos (the number will be on top of each photo) so you can comment,
or ask about them, and use the photo number as reference!
Enjoy!!
Photo #1

Photo #2

Photo #3

Photo #4
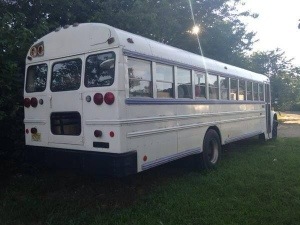
Photo #5

Photo #6

Photo #7
We own a school bus!!!

Video #1
Mike, driving La Casita Bus for the first time (and for that matter, his first school bus ever!)
Photo #8
After we bough the bus, our primary task was to secure it from vandals…
This is the lock we chose for the front door.

Video #2
Photo #9
We took the idea out of fellow busnuts and their skoolie
Bertha TheBus (http://on.fb.me/1wc0SlV)

Photo #10

Photo #11

Photo #12

Photo #13

Photo #14

Photo #15
Very easy installation! Drilled 3 holes on each door, washers and nuts… done!

Photo #16

Photo #17
This is the lock we chose for the rear door.

Photo #18

Photo #19
Closed eye hook bolts, washers and nuts… boom! Done!

Photo #20

Photo #21
Started removing some seats…

Photo #22
Started by using a ratchet from the inside of the bus,
and locking pliers from beneath the bus.
Very slow, and arduous!

Photo #23
So, we called in some backup! Yeah, baby!!!
The only downside was very little battery life.

Photo #24
After all seats were removed, we continued removing the rubber floor.
This little tool made all the difference in the world!!
Fully recommend it!

Photo #25

Photo #26
Finally! Bare metal, and some thin surface rust.

Photo #27
We have been playing it by ear…
This time, we had visited a Restore Habitat For Humanity store,
and found 1-1/2″ thick commercial grade insulation boards, at a price we couldn’t refuse!
So we bough the whole batch!

Photo #28

Photo #29

Photo #30
So, we paused the floor progress, and jumped into insulation.
First, we removed the windows, then the wall metal covers in order to expose the original insulation.

Photo #31
Took all the original insulation out, and separated the pieces we could reuse from the ones that had water damage.

Photo #32
Because we had to remove the windows to remove the wall covers,
we took the opportunity to relocate the emergency exit windows.
Now, they are side by side, to simulate barn windows!

Photo #33

Photo #34

Photo #35

Photo #36

Photo #37

Video #3
Photo #38

Photo #39
Wall insulation… done!!

Photo #40
Looking lovely!!
We reinstalled the wall covers temporarily with the minimum amount of screws possible.
We found a bit of surface rust there, and we want to tackle that soon.

Photo #41
Next, ceiling insulation.
Started by removing the lamps.

Video #4
Photo #42
Photo #43
All ceiling metal covers removed, as well as the original insulation.
Just like with the walls, we separated the water damaged insulation from the one that could be reused later.

Photo #44
Bit of surface rust in the ceiling,
but *none* around the escape hatches!!
No leaks!!!

Photo #45

Photo #46
The ribs thickness is continues the same as in the walls (2″),
great news for our 1-1/2″ thick insulation boards!!

Photo #47

Photo #48

Photo #49
We found a bit of surface rust in the ceiling,
so we opted for removing all covers (including wall covers)
in order to treat as much rust as possible.

Photo #50
Prepping for indoor power wash before the rust conversion treatment!

Photo #51

Photo #52
Corroseal, rust converter & metal sealer!

Photo #53
Available at The Home Depot
(http://thd.co/1tjXrHx)

Photo #54

Photo #55
The black spots are the converted rust,
the caramel color spots is where the metal was free of rust and got sealed.

Photo #56
Before & after

Photo #57
Wall insulation & metal covers, back on!
We applied an obscene amount of silicone to avoid leaks later on.

Photo #58
And decided to remove both cockpit fans and relocate them,
one for the living room, and the other for the bedroom.

Photo #59
While the Corroseal was curing, we decided to tackle some other tasks…
Our headlights were about to fall out of their nests!!

Photo #60
So, we bought new nests (http://bit.ly/1gtoF9H)
& trims (http://bit.ly/1gtoNGd)
from Unity School Bus Parts (www.unityparts.com)
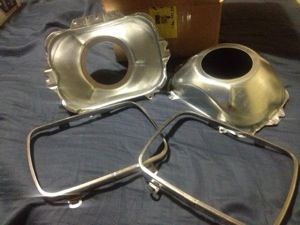
Photo #61
Wow!!!

Photo #62
And of course, we took the opportunity given that we were uninstalling the headlamps anyway,
to upgrade them from the H6054 sealed headlamps,
to euro style H4 headlamps (which have replaceable headlight bulbs),
and 60/55 Watts Ultra Blue headlight bulbs (which are 50% more brighter than OEM headlamps)
eBay link: (http://bit.ly/1hwSsdy)

Photo #63

Photo #64
New versus old…
Yup! We are happy with the upgrade!!

Photo #65
And, given we were dealing with lights…
We decided to remove the red/yellow covers from the warning lamps,
and re-wire them as auxiliary lights!!

Photo #66
We will soon buy the clear reverse light lenses to cover them!
Unity Bus Parts link: (http://bit.ly/103VhBf)

Photo #67
Yup! Those 4 warning lamps (80 Watts each) are really bright!!
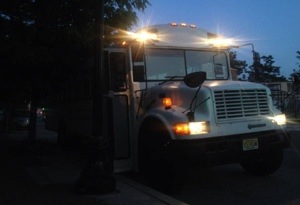
Photo #68
We decided to install window privacy films (the tint version of frosted glass),
which allow us privacy, but unlike dark limousine tints,
at night it reflects street lights to the interior of the bus,
minimizing the need for us turning lights on.
That means, less electricity consumption / more solar batteries life!
eBay link: (bit.ly/V4vwyj)

Photo #69
Soapy water, one-sided blades, and a window scraper knife.

Photo #70

Photo #71

Photo #72

Photo #73

Photo #74

Photo #75

Photo #76

Video #5
Photo #77

Photo #78
They seem like fluorescent lamps!!
Lots of brightness, no glaring spots!!

Photo #79
Before & After

Photo #80
Night shot!
We can walk through La Casita Bus with all the lights off!!

Photo #81

Photo #82
Lunch corner!!

Photo #83
Us enjoying lunch break @ La Casita Bus…
Privacy, brightness, great food and tons of love!

Photo #84

Photo #85
We were having technical difficulties while parallel parking in our dark parking spot at night,
most of the time overshooting the curb side.
So, we decided to add reverse lamps as auxiliary lamps on both sides of the skoolie.

Photo #86

Photo #87
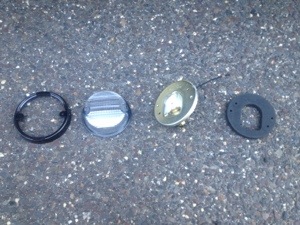
Photo #88

Photo #89

Photo #90

Photo #91

Photo #92

Photo #93

Video #6
Video #7
Photo #94
Hah! *Skylights*
Yup! We are installing skylights @ La Casita Bus!!

Photo #95
We took the idea from Christina Klyce‘s skoolie:
Photo #96
She bought it from EZ Tops Worldwide
(http://www.eztopsworldwide.com)
And, so did we!
Here are their available sizes:
http://www.eztopsworldwide.com/rvskylights.htm

Photo #97
We ordered (2) 26″x 26″x 5″ Clear Lexan 1/8″ thick.

Photo #98
It comes wrapped in masking tape.
Their website recommends unwrapping it immediately after the client receives it.
However, we chose to leave the masking tape until after installed,
to avoid scratching it while installation.

Photo #99
They come without holes, so being extremely careful,
we drilled 9 holes, evenly spaced, in each side.

Photo #100
Remove the hatch door, then the hatch assembly.

Photo #101
Using a window scraper knife, we removed the old adhesive,
and then cleaned throughly with mineral spirits.

Photo #102
Center the skylight over the opening, and mark its placement.

Photo #103
Turn the skylight upside down,
and apply a generous bead of waterproof adhesive/sealant over the edge (covering all holes).
It looks like we are applying it on top of the masking tape,
but that masking tape is in its other side.

Photo #104
Warning #1:
These skylights are made for flat surfaces, and most skoolies have convex roofs!!
Be extremely delicate when installing it, you risk cracking, and braking them!
Using self tapping screws, choose the center hole of one side, and screw it 85% of its way.
Then chose the center hole of the opposite side and repeat. Do the same with the next two sides.
Then, criss-cross, work outwards, alternating the sides, 85% of their way.
This will distribute an even bending force.
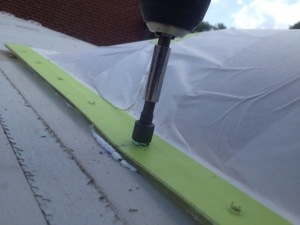
Photo #105
After all screws are 85% screwed,
tight them (slowly and delicate, you don’t want to crack the skylight),
in the same criss-cross pattern, working outwards, alternating sides.

Photo #106
Remove all the masking tape.

Photo #107
Apply adhesive/sealant on top of each screw until they are completely covered,
as well as all around the gap between the skylight and the roof.

Photo #108
Warning #2:
Clear skylights will allow the radiant heat from the sun rays to pass into the inside of your bus!
If you do not have an adequate ventilation/cooling system,
you will end up with a solar oven.

Photo #109

Photo #110

Photo #111

Photo #112

Photo #113
Being that said, we went with it anyway for one particular reason that overcomes its downside:
Because we just covered all the windows with privacy film,
these will be our only “clear windows” to the outside,
allowing us to enjoy all types of weather from sunny days,

Photo #114
…to the moon and the stars,
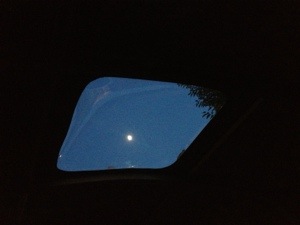
Video #8
…to rainy days.
Rainy days… either you love them, or you hate them.
For some, rain on a metal roof is an unbearable noise…
For us, it is a delicious sound, an audio gift from nature.
Next:
Seal / Insulate the roof
We ordered most of the materials from Hy-Tech
From lower left to right there is:
Polyester Seam Patching Tape
ElastoPatch Seam Seal
(2) Acriflow Latex Paint Reducer
(bag) Insulating additive ceramic beads
Photo #115

And ordered
Dicor Elastomeric Roof Coat For Metal Roofs
from http://www.pplmotorhomes.com

After applying a layer of seam patch compound on each seam,
we put seam patch tape (more like a cloth mesh) on top of it,
and applied another layer of patch compound on top.
Then, we mixed the insulating additive ceramic beads,
and the paint reducer into the elastomeric paint to create insulation paint.
And, after 3 coats of this insulation paint mix, this is the result!
Photo #117

Next:
Rear view camera
We bought the camera from Etekcity
Photo #118

The camera comes with a 2 ft. video cable,
and a 16 ft video extension cable,
but we needed more cable to run it from the rear bumper,
up to the wire channel above the windows,
down to the dash at the driving area.
Photo #119

So, we bought another 16 ft. video extension cable from here
Photo #120

And, the video adapter cable (RCA to 2.5 mm AV-in)
to pass the video signal from the camera
to our Rand McNally TND 720 GPS unit
was bought from here
Photo #121

Before committing to install everything, we did a test run
Photo #122

Then installed the tiny guy under the rear bumper
Photo #123

And, we could not like the results more!!
Photo #124

Next:
Swap the twist lock on the fuel tank access lid…
Photo #125

…to a key lock
Photo #126

Next:
Ceiling Insulation
Photo #127
We used as much as possible
from the leftovers from the wall insulation pieces

Photo #128
and cut them to size

Photo #129
and began the process of fitting them in the ceiling pockets

Out from the good pieces of the old insulation that we stored,
we cut slim pieces to fill the gaps between the ceiling ribs
and the leftover foam boards.
Photo #130

Very labor intensive to put the first ceiling metal cover back up!
Photo #131
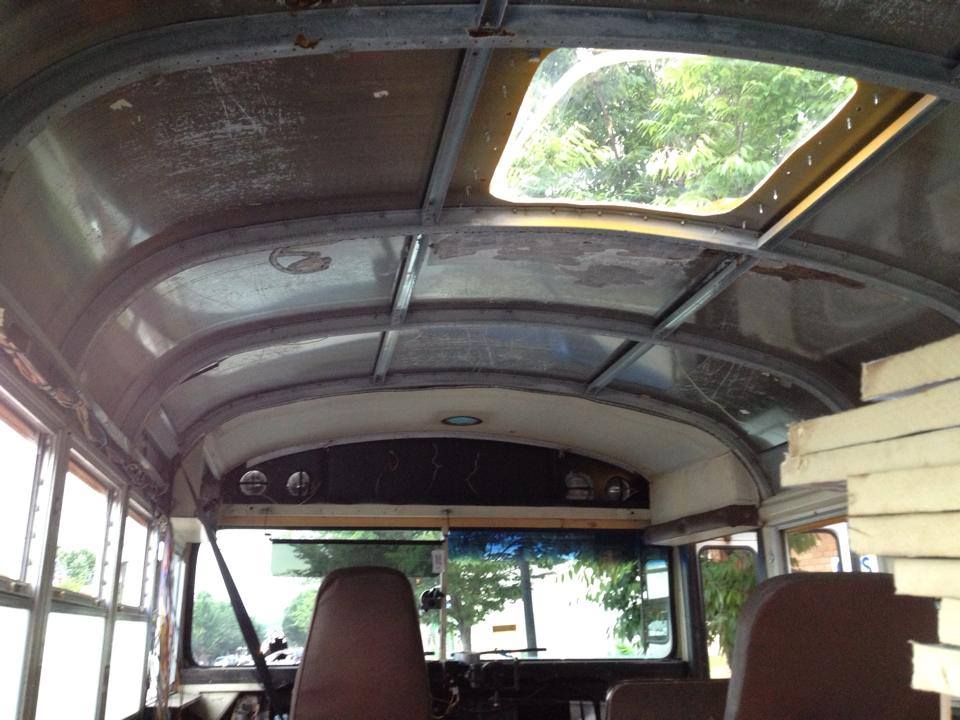


Photo #134
To aid our shoulders and backs,
we put a long piece of 2″x 4″ cross side through both windows…

Photo # 135
…and allowed the metal ceiling cover to rest on it
while we put the first set of screws back in place

Photo #136

Made sure to pass the light wires
through the light fixture opening in the ceiling metal cover.
(2) 2″x 4″ would have been way better for added stability,
but our “ideas bulb” was almost burnt by that time.
Photo # 137

Made sure the light works
before fastening more screws!
Photo #138
Photo #139

Reinstalled the escape hatch ceiling cover
Photo #140


At this point, we already had exhausted all
the leftover pieces of insulation board,
and we started placing the custom cut boards in the ceiling.
We cut it wide enough for an extra tight fit.
Photo #142

So, we continued placing all the boards in the ceiling,
and then we would tackle all the ceiling metal covers at once.
Photo #143

Ceiling insulation, DONE! 🙂
Photo #144

Next:
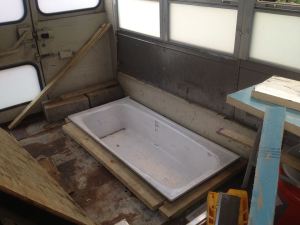
Bathtub!!!
We found a plastic bathtub in one of our regular runs through the
Restore Habitat For Humanity store,
at a price we could not ignore!
Photo #145

The first thing we thought of was
headroom clearance.
Because the tub floor would sit taller
than a regular shower pan.
So, we immediately thought of having the bathtub
flush mount to the floor,
because there was 3 ft. clearance from the ground to the metal floor.
So, we cut the front face wall, and 3/4 of the tub’s foam base.
Photo #146

Then, we marked and cut the metal floor
with the angle grinder equipped with a cutting wheel
Photo #147

Photo #148
We cut flush to the chassis beam,
and through a few floor rib supports

Photo #149
This is how the tub would sit in reference to
the metal floor, and the chassis beam.

We built a wooden box,
supported initially by the metal floor.
Photo #150

This is how it looks from inside
Photo #151

And this is how it looks with the tub sitting on the box
Photo #152
We surrounded the box with insulation foam boards
(where space allowed it)
Photo#153

And used “Great Stuff” spray foam insulation
where we couldn’t fit the insulation foam boards
Photo #154

Then, we added an outside wall that enclosed
all the insulation, added threaded rods
through 2″x 4″ for its main support,
and cut a hole for the tub’s plumbing.
Photo #155

A look from the inside
Photo #156

Next:
Floor plan (re)design
Photo #157
This was the initial floor plan

We had to redesign the original floor plan
to go around the new bathtub.
This meant that some features would be gone due to
space and weight distribution.
This is what we came up with:
Main entrance was changed to the front of the bus.
There is a wall (and the house main door)
dividing the cockpit from the living quarters.
The loveseat sofa was replaced with round chairs.
The sliding full size bed was eliminated.
Photo #158

There is an media center
with a flat tv, and a home theater system.
That lower cabinet houses a closet.
The cabinet behind the round chairs
houses a horizontal Murphy-like bed.
The chest freezers were brought to
the middle of the bus under a “flip-up” countertop.
Stove was brought to the middle of the bus as well.
Photo #159

Round chairs moved out of the way
for the murphy bed to be deployed.
Photo #160

Bathtub, comode, and sink are all together inside bathroom walls.
Full size bed was moved to the rear of the bus.
Photo #161

Real life is not too far from the design!
Photo #162

Next:
We removed the original driver seat…
Photo #163

…fabricated a frame,
and mounted 2 bucket seats out of a Ford Explorer.
Photo #164

Next:
Metal floor rust treatment
As with the walls, and ceiling,
we used Corroseal
Photo #165
Photo #166
Before:

Photo #167
After:

Then added a thick coat of
RustOleum Metal Primer
Photo #168

Photo #169

Filled all the holes from the seats’ bolts
Photo #170

And, added 2 coats of the
elastomeric paint mixed with
Hy-Tech Buskote ceramic insulation beads additive
that we used in the roof
Photo #171

Next:
Insulated subfloor
We cut the 2″x 4″ @ 45″ long,
as well as the insulation foam boards,
and the plywood boards for
ease of storage, transport and
maneuverability inside the skoolie.
Photo #172

Photo #173

Photo #174

Photo #175

Photo #176

Photo #177

Photo #178

Photo #179

Subfloor, DONE! 🙂
Photo #180

Next:
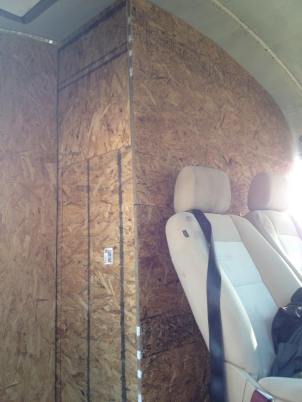
Wall & door that divides the driving area
from the living quarters
Photo #181

We used the rear wall top metal cover to trace
the ceiling curvature onto a foam board,
which is really easy to trim.
Photo #182
Photo #183

Photo #184


Photo #187

Photo #188

Bedroom / Bathroom divider wall frame,
bed frame,
and 110 gallons fresh water tank.
Photo #190

Full size mattress with plenty of headroom!
Photo #191

Wood stove!

Many more photos to come!!
Stay tuned!!
We invite you to follow not only our progress while converting our bus into our home, but our progress and life experiences while downsizing and simplifying our life together. Feel free to Contact Us with all your comments, questions, and future posts suggestions!
Mike & Lala @ La Casita… Bus!


Amazing work going on here. Love the separate driver’s cabin idea.
LikeLike
Hello Jeff!
Yeah, one thing led to the other, and we just loved the outcome! It started by thinking of saving energy on winter time by building a transition area. We built a wall with a door in order to keep heat from escaping when the bus doors open. However, there was no way we would be ok with one of us driving, and having no contact whatsoever with the other behind the wall. So we came up with the idea of a bar seat, like in old american cars, but they were to uncomfortable. The bucket seats was the solution. And it worked just fine! We couldn’t find bucket seats woth built in seatbelts at an affordable price, but we improvised. We have it on our wishlist!
LikeLike
And,thank you for the props! But the real hero here is the amazing community full of great Busnuts with their skoolies, and great advice & ideas!
LikeLike
You guys are doing such a great job!!! Really clever, you’ve given me a lot of ideas. How long have you been working on this? Seems like you’re powering through.
LikeLike
Hello Rosita / We are happy to know you like what we have done so far! However we are not currently powering through. We started Fall 2013, and worked in it until Winter 2014. However, we parked it, and put the project in stand by. A job opportunity overseas came flashing by, and we took advantage of it. We can’t wait to go back, finish it, and live it full time!
LikeLiked by 1 person
Thats awesome, glad you took advantage of the opportunity. You’ll always have the bus to come back to anyway and I’m sure you’ll jump right back to work as soon as you can! My boyfriend and I are trying to save up all we can to start work on our Hino pmc bus and can’t wait to get it to where you guys are at now!!
LikeLike
Thank you for sharing all this great info! We are just starting our bus and this has got us very excited. We have purchase a short bus just for weekend fun but I’m hopeing to inspire us to let it all go and simplify our lives.
LikeLike
Awesome news! We hope our experiences help you avoid unnecessary setbacks! We send you our best wishes!
LikeLike